2019-10-18

The producers of the Resident Evil movie franchise are asking the courts to throw out a lawsuit from the stunt performer who sustained injuries so bad on the set of the latest movie that she needed to have one of her arms amputated. The legal team for director Paul W.S. Anderson and producing partner Jeremy Bolt filed documents asking for Olivia Jackson's lawsuit to be dismissed.Jackson's "American lawyers are suing the wrong people in the wrong place," the legal team for Anderson and Bolt said in its request for dismissal. The lawsuit was filed in Los Angeles Superior Court in August this year; Jackson is asking for unspecified damages to help pay for her medical bills, which are ongoing. Jackson suffered serious injuries on the set of Resident Evil: The Final Chapter when performing a motorcycle stunt that went wrong. It was so bad that doctors amputated her left arm above the elbow.According to The Hollywood Reporter, Jackson's lawsuit claims that "Anderson and Bolt created an unsafe working environment on the set of the last installment of the popular movie franchise, and also failed to procure adequate insurance to cover the injuries that resulted from her crash." Anderson and Bolt, meanwhile, claim that because Jackson was reportedly hired for The Final Chapter by an "unrelated" company based in South Africa, they are not responsible for paying damages.The lawyers for the director and producer also state that this company, Davis Films, tried to get Jackson a $3.2 million liability policy from a South African insurance company called Hollard Insurance. However, Hollard reportedly would not pay Jackson's claim because the terms apparently stated that the policy does not cover "all cast and crew."Davis did, however, pay $248,265 to Jackson to help her cover her medical expenses, according to the suit. Anderson and Bolt's lawyers say Jackson's attempt to resurface the issue in California court is a "publicity stunt masquerading as a lawsuit."Go to THR to get more details on the case.Jackson also did stuntwork for Guardians of the Galaxy Vol. 1, Mad Max: Fury Road, and Avengers: Age of Ultron. Performing a motorcycle stunt for Resident Evil actress Milla Jovovich in The Final Chapter, Jackson smashed into a camera after it failed to lift in time, according to her lawsuit. Jackson suffered serious injuries and was in a coma for 17 days before waking up to realize the extent of her career-ending injuries.October 2015, Jackson released a Facebook post that detailed the extent of her injuries, which included "brain bleed[ing], brain swelling, severed main artery in the neck, crushed and degloved face, several broken ribs, paralyzed arm, shattered scapula, broken clavicle, broken humerus, broken radius and ulna, with an open wound and a 7.5 piece of bone missing, [and an] amputated thumb." In an interview she stated: "My facial scarring is horrible and I wish I had my old face. But I'm truly grateful to be alive."Resident Evil: The Final Chapter was released in January 2017, and was the most successful movie in the series to date, making $312.2 million worldwide. In total the series, which kicked off in 2002, has made more than $1.2 billion worldwide.Info from Gamespot.com
2019-10-18

Apex Legends developer Respawn's new Star Wars game, Jedi Fallen Order, is coming up on its release in November. The time before release can be when developers push extra hard in what is known as a "crunch" period.The game's director, Stig Asmussen, has now shared his perspective on the practice of crunch and how the Jedi Fallen Order team worked to try to make sure its developers did not burn out. His comments came not long after top developers at CD Projekt Red (Cyberpunk 2077) and Crystal Dynamics (The Avengers) also spoke out about crunch, and you can see their thoughts further down the page.Speaking to Eurogamer, Asmussen said Respawn never enforced crunch periods on Jedi Fallen Order--and that's a change. For some of his past games (Asmussen was the game director for God of War III), he said he was part of teams that were forced to work extra long hours."Basically everybody said, 'You've gotta work these hours," and we realised that wasn't a fair and sustainable approach [for Fallen Order]."For Fallen Order, Asmussen said individual developers could decide what hours they wanted to work. "We left it up to the team," he said. "It's like, 'Look, everybody I think carries their own responsibilities and their own tasks, and takes them very seriously, so why treat people like children, and say you have to be here at a certain time?'"For those who want to work extra hours, "It's your choice," Asmussen said. Those who stay late were given "support," including meals after hours, he added. On top of that, Asmussen said some of the project leads worked extra hours to show their team members that they are acting as a unit."We're not going to tell you there are certain hours we're going to be crunching at. You can make your own schedule, and the leads made a commitment to put in extra effort and extra hours as well to show that we're all in it together," Asmussen said."We understand your life outside of work is far more important than what you're doing in the office, and we try to respect that." -- AsmussenEven if Respawn did not enforce crunch or have their employees stick to strict schedules, some developers might feel pressured to work beyond what is normal to finish a project and demonstrate their commitment to colleagues and bosses. Eurogamer asked Asmussen if Respawn keeps a close eye on developers to ensure they are working in a healthy and safe manner, and the director responded emphatically."Absolutely," Asmussen replied. "I know there are several times over the course of development where I told people to go home. You get so close to it you lose perspective, and not only that, you risk people burning out. At Respawn it's a really big deal [that] we understand your life outside of work is far more important than what you're doing in the office, and we try to respect that."Unlike the movie and TV industries, video game industry workers are largely non-unionized. People who work on movie and TV sets can typically only work a set number of hours based on their union contracts, but this kind of setup is considered to be rare in gaming. Over the years, various video game developers have been accused of demanding lengthy crunch periods, and the stories of burnout are prevalent.Just recently, CD Projekt Red commented on the the vibe at the studio now with Cyberpunk 2077 entering the end of its production period ahead of its April 2020 release date. CD Projekt Red's John Mamais, who heads up the company's Krakow office, said everyone is "working really hard right now" to hit the deadline for Cyberpunk 2077. He said the team is excited by the positive reactions at industry events--like PAX Aus most recently--but that in turn creates pressure, and some developers feel like they are in a "vice.""You're in a vice, in a way, which takes its toll on the team." -- CDPR Krakow's John Mamais on how developers might feel"I guess the vibe in the office is there's always a level of excitement there based on results that we get from going to conferences like this [PAX Aus] and seeing people really excited about the game. So that keeps the hype up but it also puts some pressure on, so that's kind of the vibe," he said. "You're in a vice, in a way, which takes its toll on the team but there is ... a healthy, extrinsic kind of pressure to make [the team] really excel."Mamais added that working at CD Projekt Red is not for everyone--some have come in and found the experience too challenging. CD Projekt Red is trying to put practices in place to "keep the work under control," Mamais said, though he acknowledged "it's not always possible to do that.""There are a lot of people who come into the industry that are fresh; they don't really understand what it takes to do it," he said. "So we get a lot of new guys coming in, and they go, 'Oh god, this is like too much.' But then we have other guys come in from Rockstar Games, and they're like, 'This is not even crunch!' We're doing the best we can to keep the work under control. But sometimes when you're doing some big-ass game like this, it's not always possible to do that. It takes really hard work to make it really awesome."In October 2014, before the launch of CD Projekt Red's acclaimed RPG The Witcher 3, the studio was accused of "crunching for over a year" in a bid to overcome development challenges.Also at PAX Aus, Crystal Dynamics boss Scot Amos told GameSpot that the studio has a "family first" mentality for the ongoing development of The Avengers. "One of the things that I tell my team all the time: If you have a kid's birthday, then go take care of your kid's birthday, like what, what are you crazy?" he said.Amos said he is aware of the "horror stories" about crunch in video games, but for Crystal Dynamics, he wants to have his team work in a "smart, balanced way.""We've actually changed everything from structures of how we do certain workdays with no meetings, go and get stuff done days which are very focused, 'Hey, come in, and get your stuff done, we don't want to interrupt you,' we'll provide meals free, whatever it is," he added.For more on these stories, check out GameSpot's extended coverage below.Marvel's Avengers -- Studio Head Talks Character Appearances, Crunch, And Squirrel GirlCyberpunk 2077 Dev Talks Multiplayer, Censorship, Crunch, And MoreInfo from Gamespot.com
2019-10-18

In November 2018, Microsoft announced the acquisition Obsidian Entertainment, the developer behind Fallout: New Vegas and Star Wars: Knights of the Old Republic 2 - The Sith Lords. The studio has since expressed appreciation for Microsoft in the year following the acquisition, stating that being a part of Microsoft has provided an added level of security when it comes to making games."On the studio level, for me personally, one of the nice things is that now that we're a part of Microsoft, we're focusing more on what the next games are going to be, rather than, 'How do we pitch the next games?'" Obsidian senior designer Brian Heins said in an interview with Wccftech."When we were acquired, Microsoft's said to us, 'We're buying you because we want you to keep making games the way you've been doing, not to change you.'" he continued. "And that's been reassuring a lot of people on the team; we're not suddenly going to be asked to be a different studio than we have been. We have been given the assurance to keep making these games that our fans like--hopefully on a grander scale and better quality." It's a sentiment also expressed by Double Fine boss Tim Schafer, whose studio has also recently been acquired by Microsoft.Obsidian is currently on track to launch The Outer Worlds on Xbox One, PS4, and PC on October 25 with a Switch release scheduled for later. A sci-fi choice-driven RPG, The Outer Worlds is a spiritual successor to Fallout: New Vegas. There's an added emphasis to player consequence in The Outer Worlds, though, encouraging you to replay the campaign more than once. Your choices can have far-reaching effects on the overall campaign, so your actions can create very different stories.If you're grabbing The Outer Worlds, expect a massive day one patch for the physical versions of the game. On both Xbox One X and PS4 Pro, The Outer Worlds is enhanced to play in 4K.Info from Gamespot.com
2019-10-17

Death Stranding was first revealed at E3 2016, and in those three years creator Hideo Kojima has done his usual slow-drip of trailers and gameplay demos to stoke our curiosity and confusion. It's only now that people outside of Kojima Productions are able to actually play the game, and while opinions of any kind are currently under wraps, we can at least share that the Death Stranding review embargo will officially lift on November 1 at 12:01AM PDT.The most recent opportunity for Kojima to demonstrate what he's been working on since leaving Konami was Tokyo Game Show 2019. There, over the course of two days, Kojima gave us a deeper look into the moment-to-moment gameplay of Death Stranding, which included everything from mundane traversal to battles against supernatural enemies. He followed that up with a closer look at the private quarters of Sam Porter Bridges, the main character played by Norman Reedus. It was a very revealing demo, though not in the way you might expect.Reedus is but one of many celebrities that will appear in Death Stranding, along with Guillermo Del Toro, Mads Mikkelsen, and Lea Seydoux, to name but a few. Sadly, Keanu Reeves won't make an appearance despite rumors. We've also learned that real-world brands like Monster Energy will also be prominently featured in the game--it's anyone's guess as to whether or not these inclusions will have an impact on the credibility of the fictional (and strange) world that Kojima has crafted.In fact, the strangeness has been at the heart of the game's messaging since the very beginning. If you fell off trying to make sense of Death Stranding a long time ago, now is the perfect time to brush up on everything we've learned so far, including details about the world, the characters that inhabit it, and the unusual constraints that will be set upon Sam as you guide him across treacherous terrain in a bid to reunite the once united states of America.If our current Death Stranding guide isn't enough, you can also take Kojima's very straightforward explanation below:https://t.co/z7WMowWerK pic.twitter.com/DbWzSfMsEN — HIDEO_KOJIMA (@HIDEO_KOJIMA_EN) May 29, 2019After Death Stranding reviews land on November 1, the rest of us will have to wait until the game releases on November 8 to see what all the fuss is about. (Kept you waiting, huh?)Info from Gamespot.com
2019-10-17

Taco Bell is partnering with Microsoft for another promotion, this time giving you a chance at a shiny new Xbox One X, along with an Xbox Elite Series 2 controller before it's widely available. Oh, and the Xbox makes that signature Taco Bell "bong" sound again. You know the one.From October 17 through November 23, ordering a Double Chalupa Box will get you a code to enter for a a chance at an Xbox One X Eclipse bundle. The bundle includes a limited edition Xbox One X Eclipse console with a white-to-black fade design and the Taco Bell ring at startup, plus an Xbox Elite Wireless Controller Series 2, and a six-month subscription to Xbox Game Pass Ultimate.The Series 2 controller is releasing on November 4, so if you win early enough in the promotion you just get a controller before anyone else can even buy it. The prize bundles will be awarded every 10 minutes on average, and the companies promise a quick turnaround time for winners--possibly as fast as 48 hours after redemption.Meanwhile, you can also score some Game Pass Ultimate time just by ordering your food. Ordering a Double Chalupa box online or through the Taco Bell app will get you a code for a 2-week Xbox Game Pass Ultimate membership. You can stack two codes on top of each other for roughly a month of Ultimate. Check the full rules for all of the contest details.Xbox Game Pass Ultimate is the top tier of Microsoft's all-you-can-eat subscription service, combining Game Pass for console, Game Pass for PC, and Xbox Live Gold into a single subscription. It usually costs $15 per month, as opposed to $10 per month for each Game Pass tier individually.Info from Gamespot.com
2019-10-17
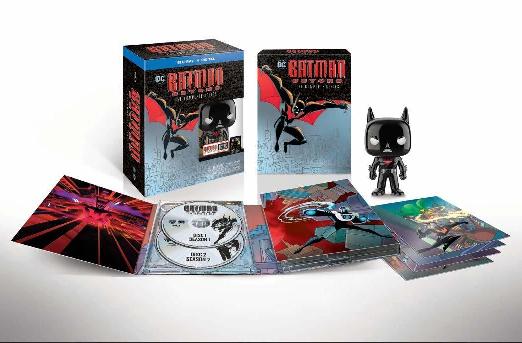
The remastered release of Batman Beyond is almost here, and right now you can save $30 on your pre-order. Releasing October 29 on Blu-ray for the first time, the Batman Beyond limited-edition box set is down to $69.96 (was $100) at Amazon and Walmart. The re-release of one of the greatest animated superhero shows is a 20th anniversary celebration of sorts.The box set comes with the complete series, all three seasons (52 episodes), and Batman Beyond: Return of the Joker, the direct-to-video follow-up that capped off the story. While Return of the Joker was already available in Blu-ray, the show has only released in DVD format up until now. The box set also comes with digital versions.In addition to the TV run and full-length movie, this edition contains a bonus disc with 15 featurettes, two of which were created specifically for the re-release: "Knight Immortal" and "Nostalgic Tomorrow -- A Batman Gathering."Because of Amazon's pre-order guarantee, if the price should drop again between when you place your order and the item ships, you'll only be charged the lowest amount.Batman Beyond: The Complete SeriesSee at AmazonSee at WalmartAs a numbered, limited-edition set, you'll also get some neat collectibles with your pre-order. If you're into Funko Pops, the box set comes with an exclusive metallic Funko of the Caped Crusader. The four lenticular art cards make this set even more enticing for collectors.The re-release comes at a very fitting time. The pilot episode of Batman Beyond actually starts in 2019, before quickly skipping forward 20 years. The elderly Bruce Wayne soon becomes a mentor to a new, teenage Batman in Neo-Gotham, a futuristic version of Gotham. When it comes to Batman, there's nothing quite like Batman Beyond. Whether you're looking to check off a Batman fan on your shopping list or you're simply nostalgic for the sci-fi stylings of Neo-Gotham, this Batman Beyond box set isn't likely to disappoint.Info from Gamespot.com
2019-10-17

Pokemon Sword and Shield are just around the corner, and Nintendo and the Pokemon Company are teasing bonus extras you can claim in the game. This time a Galar Research Update revealed three new Gigantamax forms, each offered as a free bonus.For those who played Pokemon Let's Go Pikachu / Eevee, you can claim special Gigantamax versions of Pikachu and Eevee in Sword and Shield. Pikachu transforms into a chunky mouse with a glowing tail and a G-Max Volt Crash move to paralyze all opponents. Eevee gets even fluffier than usual and uses G-Max Cuddle to infatuate opposite-gender opponents. You'll be able to claim your special Pikachu and Eevee once you arrive at the WIld Area Station.Those aren't the only special monsters, though. If you play Sword and Shield between November 15, 2019 and January 15, 2020, you'll be able to obtain a Gigantamax Meowth as a Mystery Gift. He's a weird-looking stretched out cat with a G-Max Gold Rush move that confuses opponents and gives bonus money.The announcement notes that none of these special version of Pikachu, Eevee, or Meowth can evolve. But why would you want them to? The reveal also showed off a Gigantamax Charizard and Butterfree.We recently learned that Pokemon Sword or Shield will take up about 10 GB of space on your Nintendo Switch. Fat Pikachu is probably a solid half of that. Pokemon Sword And Shield News Pokemon Sword And Shield Offering Three Free Exclusive Gigantamax Pokemon Pokemon Sword And Shield Pre-Order Guide: Bonuses And Discounts Pokemon Sword & Shield: Here's Every Gen 8 Pokemon Revealed So Far [Update] Pokemon Sword Vs. Shield: What Are The Version Differences? Info from Gamespot.com
2019-10-17

A new trailer for Pokemon Sword and Shield has arrived. This video gives us our first look at a handful of new Gigantamax forms that some classic Gen 1 Pokemon such as Pikachu and Charizard will be able to take on in the upcoming Switch games.The trailer begins with Pikachu, which resembles its original, chubby incarnation when it Gigantamaxes. In this form, its Electric-type attacks become G-Max Volt Crash, a move that dishes out damage and also paralyzes all opponents.The other starter from the Pokemon Let's Go games, Eevee, will also be able to Gigantamax in Sword and Shield. When it transforms, the fur around its neck becomes extra fluffy, and its Normal-type attacks turn into G-Max Cuddle. In addition to dealing damage, this move causes Pokemon of the opposite gender to become infatuated, which may prevent them from attacking.Other classic Pokemon that can take on new forms when they Gigantamax include Butterfree, Charizard, and Meowth. Butterfree's wings expand to Mothra-like proportions, while Charizard's wings are formed out of flames. Meowth, meanwhile, is hilariously elongated. You can take a look at all the new Gigantamax Pokemon in the trailer above.New Gigantamax PokemonPikachuEeveeCharizardButterfreeMeowthLongcat is in #PokemonSwordShield! pic.twitter.com/2RaNpqn1t9 — GameSpot (@GameSpot) October 16, 2019As previously confirmed, Pokemon that are capable of Gigantamaxing will be hard to find in Sword and Shield, but you'll be able to get three of the newly revealed Pokemon for free. If you've played either Let's Go Pikachu or Eevee, you'll receive a Pikachu or Eevee that can Gigantamax from the Wild Area Station, while all players who purchase the game by January 15, 2020 will be able to download a Meowth that can Gigantamax as a Mystery Gift. None of these special Pokemon are able to evolve, however.Pokemon Sword and Shield launch for Switch on November 15. You can take a look at all the new Gen 8 Pokemon revealed so far in our gallery. And if you're looking to secure a copy ahead of their release, be sure to check out our Pokemon Sword and Shield pre-order guide. Pokemon Sword And Shield News Pokemon Sword And Shield Offering Three Free Exclusive Gigantamax Pokemon Pokemon Sword And Shield Pre-Order Guide: Bonuses And Discounts Pokemon Sword & Shield: Here's Every Gen 8 Pokemon Revealed So Far [Update] Pokemon Sword Vs. Shield: What Are The Version Differences? Info from Gamespot.com
2019-10-17

Get ready to plan your streaming service viewing for November as Amazon Prime Video has revealed what's coming next month. In addition to watching the NFL live on Thursday nights, Amazon is releasing plenty of movies, TV shows, and originals to watch, including a bunch of James Bond movies. Check out the list below.On November 1, Amazon Prime Video is releasing most of its content, and this includes plenty of James Bond movies. You can watch Goldeneye, Goldfinger, The Man with the Golden Gun, and many other non-gold related Bond movies from every era. We recommend checking out Live and Let Die, as it has the voodoo priest Baron Samedi in it, and I loved playing as him back in the day in Goldeneye.One of Amazon's big selling points is that it streams NFL games on Thursday nights. There are three games airing during the month, with the biggest being being Colts vs. the Texans on the 21st.Additionally, there is plenty of non-football, non-James Bond content coming to Amazon during the month. On the first of the month, you can watch movies like Bad Santa, Flashdance, The Ring, and the classic bowling comedy movie Kingpin.Below, you'll find the full list for everything coming to Amazon Prime Video in November. And to see what's going on this October, check out that month's lists for Netflix and Hulu.New to Amazon in NovemberNovember 1A View To A Kill (1985)Bad Santa (2003)Big Top Pee-Wee (1988)Chinatown (1974)Diamonds Are Forever (1971)Die Another Day (2002)Double Jeopardy (1999)Dr. No (1962)Escape From Alcatraz (1979)Everything You Always Wanted To Know About Sex * But Were Afraid To Ask (1972)Fatal Attraction (1987)Fire with Fire (2012)Flashdance (1983)For Your Eyes Only (1981)Freelancers (2012)From Russia With Love (1963)Gloria (English Subtitled) (2014)Goldeneye (1995)Goldfinger (1964)Kingpin (1996)Licence To Kill (1989)Light Sleeper (1992)Live And Let Die (1973)Moonraker (1979)Never Say Never Again (1983)Octopussy (1983)On Her Majesty's Secret Service (1969)Overlord (2018)Reds (1981)Save the Last Dance 2 (2006)Soapdish (1991)Summer's Moon (2009)Sweeney Todd: The Demon Barber of Fleet Street (2007)The Counterfeit Traitor (1962)The Firm (1993)The Living Daylights (1987)The Man with the Golden Gun (1974)The Ring (2002)The Spy Who Loved Me (1977)The World Is Not Enough (1999)Thunderball (1965)Tomorrow Never Dies (1997)Training Day (2001)Tyler Perry's Madea's Big Happy Family (2011)Tyler Perry's Madea's Witness Protection (2012)You Only Live Twice (1967)Tom Clancy’s Jack Ryan: Season 2 – Amazon Original seriesL.O.L. Surprise: Winter Disco Movie (2019) – Amazon Original kids specialNovember 6Texas Chainsaw 3D (2013)November 7Thursday Night Football: Chargers @ Raiders (NFL)November 8One Child Nation (2019) – Amazon Original movieNovember 13Anna and the Apocalypse (2018)Romans (2017)November 14Instant Family (2018)The Souvenir (2019)Thursday Night Football: Steelers @ Browns (NFL)November 15Creed 2 (2018)The Man in the High Castle: Season 4 – Amazon Original seriesNovember 19Bottom of the 9th (2019)November 20The Fanatic (2019)November 21Thursday Night Football: Colts @ Texans (NFL)November 22Costume Quest: Christmas Special – Amazon Original seriesNovember 29The Report (2019) – Amazon Original movie (following theatrical release on November 15)November 30Low Tide (2019)November 2019Brittany Runs a Marathon (2019) – Amazon Original movieThe Feed: Season 1 – Amazon Original seriesInfo from Gamespot.com
2019-10-17

Pikachu is the sweet smiling face of the Pokemon franchise, an adorable and marketable creation that can be slapped on lunchboxes and sneakers alike. Before he was refined into his current form, though, he was a weird, squat little mouse the fans have lovingly nicknamed "Fat Pikachu" or sometimes "Chubby Pikachu." With the announcement of his Gigantamax form in Pokemon Sword and Shield, the Pokemon Company is paying homage to the classic look.First, take a look at how Pikachu has evolved over time. On the left is his original appearance in key art from 1998's Pokemon Red and Blue. He's rounded, without much of a neck, and his arms and legs aren't well-defined as separate from his body. On the right is his key art from 2018's Pokemon Let's Go Pikachu, with a distinctly rounded head, slimmer body, and more defined arms, hands, and feet.In short, Pikachu has slowly become more human-like. His modern look more closely resembles a human baby, which makes sense. Humans are hard-wired to view infants as cute, and lots of cartoons imitate their traits (like big eyes, toothless mouths, and chubby fingers) to endear the audience to them. As the chief mascot for one of the biggest kids' properties in the world, of course artists would slowly sand off the rough edges to make him more marketable.Now compare those two Pikachus to the new Gigantamax form that debuts in Pokemon Sword and Shield. It's unmistakably the old "fat Pikachu" design put through modern design sensibilities.The old "fat Pikachu" design has still gotten affection as kitsch or nostalgia, as well as genuine preference from some official Pokemon artists. Legendary Pokemon CCG artist Mitsuhiro Arita said as much himself in an interview with GameSpot."I prefer rounder Pikachu," Arita said. In response to a question about whether this is his personal version of Pikachu, he said, "Not really just limited to Pikachu, but in general I feel like Pokemon aren't really dark, negative, or depressing. They're happy, they're joyful. So I think that feeling has just kind of come out and expressed itself in these cards."Whatever the reason, the new Gigantamax Pikachu is an homage to the classic, and a ton of fun in his own regard. He's a free bonus if you have a save from Pokemon Let's Go Pikachu on your system when you play Sword and Shield, along with a super-fluffy Eevee. You can check out those and some other newly-revealed Gigantamax forms, including one for Charizard that looks downright scary. Pokemon Sword And Shield News Pokemon Sword And Shield Offering Three Free Exclusive Gigantamax Pokemon Pokemon Sword And Shield Pre-Order Guide: Bonuses And Discounts Pokemon Sword & Shield: Here's Every Gen 8 Pokemon Revealed So Far [Update] Pokemon Sword Vs. Shield: What Are The Version Differences? Info from Gamespot.com
2019-10-17
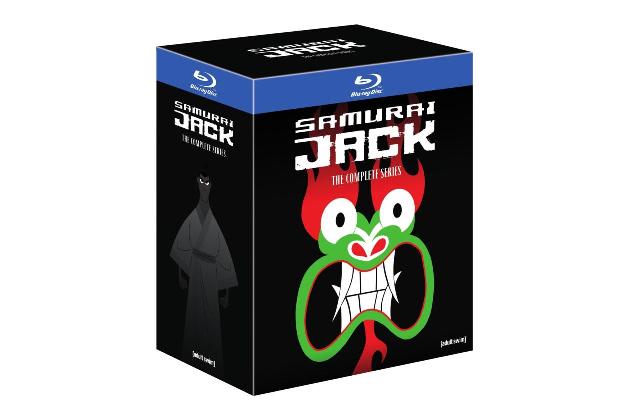
Talking animals, aliens, robots, magical creatures -- that's just a sampling of some of the beings Jack encounters during his adventures across the strange dystopian world depicted in Samurai Jack. The complete series is a wild ride marked by its distinct visual style and ultra-cool action sequences. Right now, you can pick up Samurai Jack: The Complete Series for $54.96 at Amazon and Walmart, which is a savings of $58.03 (just over 50% off!).Created by Genndy Tartakovsky, the man behind Dexter's Laboratory and Star Wars: Clone Wars, Samurai Jack's first season debuted in 2001. It ran for four seasons on Cartoon Network before going off the air in 2004. Thankfully, the series received a proper ending in 2017 on Adult Swim with season five. Samurai Jack: The Complete SeriesSee at AmazonSee at WalmartThis Blu-ray box set compiles all five seasons (62 episodes), with the first four seasons digitally remastered in HD.Fo those unfamiliar with Samurai Jack, the series follows a samurai prince on a mission to stop Aku, a shape-shifting demon who rules over a futuristic, dystopian version of Earth. Jack must defeat Aku and make his way back to his own timeline. The series was well-received, garnering more than a handful of Primetime Emmy Awards during its initial run.While the animated series is great, the games based on Samurai Jack didn't live up to the name. Info from Gamespot.com
2019-10-17
Analogue Pocket Coming In 2020, Supports Game Boy Advance, Game Gear, Neo Geo Pocket Color, And More

Analogue's track record of releasing high-end old-school consoles is second to none, and in 2020, the company will expand its business into the portable space. The Analogue Pocket is a handheld system that is designed for playing original Game Boy, Game Boy Color, and Game Boy Advance games out of the box, as well as Game Gear, Neo Geo Pocket Color, Atari Lynx, and more unannounced game libraries with the use of cartridge adapters in the future. It's a $200 device (before tax, shipping, and handling), and as far as Analogue is concerned, the Pocket packs one of the best-looking screens around.The Pocket's 3.5-inch LTPS LCD screen is the most expensive component in the device "by a long shot" according to Analogue head, Christopher Taber. Claims of "pro level color accuracy, dynamic range, and brightness" tell some of the story, but more critical is the fact that the screen delivers 615 ppi at 1600x1440. This means the Pocket's screen will allow for exact 10x scaling of Game Boy, Game Boy Color, and Game Gear games' native 160x144 resolution, and allow for plenty of wiggle room when scaling games at other resolutions. "Pocket beautifully displays non-integer scaling due to the displays high 615 ppi and our control over the display directly," said Taber. "This feature allows for every system's unique resolution to populate the screen without compromising visual quality and maintaining sharp pixels. In other words, at non integer scaling Pocket will not see the notorious issues you'll see on most other displays when scaling at non-integers."The other big hardware-related Pocket detail is the inclusion of two FPGAs--the chips that serve as the basis for Analogue's authentic hardware simulations. The handheld includes both Intel Cyclone V and Cyclone 10 FPGAs (Taber and Analogue aren't saying which versions quite yet), and Analogue states that the additional FPGA is there strictly for third-party support. Taber told GameSpot that Analogue is working with other developers behind the scenes to support their Pocket-related creations, and press materials also directly mention the Mister platform as an example of what customers can expect when envisioning the benefits of this extra hardware. Mister is an FPGA-centric project that's rallied a community of developers to recreate vintage gaming hardware on an-off-the shelf system designed for makers and educators, and it saw a flood of new releases in 2018 and 2019.Analogue is going out of its way to make the Pocket a versatile device, and that extends outside of gaming and into the world of music creation--a realm that also goes hand in hand with vintage Game Boys. Having partnered with Nanoloop and Oliver Wittchow, Analogue will effectively deliver a robust sequencer and synthesizer in each Pocket, to be based on Nanoloop 2 but with a modified Pocket-friendly user interface.Also in 2020 but for an undisclosed price, Analogue plans to release a dock for the Pocket designed to display portable games on your TV, either natively over HDMI or on a CRT via Analogue's $80 DAC. The dock will support both wired and bluetooth controllers.Analogue still has a lot to divulge regarding the Pocket, but early details paint a promising picture of what's to come. For a look at the company's most recent products, check out our reviews of the Super Nt and Mega Sg, two consoles that impressed us with their attention to detail, inside and out. Info from Gamespot.com
2019-10-17

Taika Waititi's Thor: Ragnarok was just the shot in the arm the Thor movies needed. It was hilarious, had an incredible story, and introduced us all to one of the MCU's funniest characters, Korg. After appearing in both Thor: Ragnarok and Avengers: Endgame, fans have been dying to know if we'll see more of him, and on a recent Jimmy Kimmel Live appearance, Waititi confirmed this isn't the last we've seen of Korg.During the appearance, which you can see below, director Waititi discussed the upcoming 2021 movie, Thor: Love and Thunder, and he jokingly said, "There's more Thor. There's twice the Thor." He continued, stating Natalie Portman would also be playing a version of Thor in this movie. However, the best moment of the interview came when he said that his character, Korg, would be making his return.As to what Korg will be up to in this movie, only Waititi knows for sure, as the movie is still in pre-production. The last time we saw Korg, he was in New Asgard--Tønsberg in Norway--and he's been gaming hard and dealing with an annoying gamer named Noobmaster69. He's spent his days with Thor and Miek, locked up in a house, eating, drinking, and having a good time.Thor: Love and Thunder was announced at San Diego Comic-Con back in July. Waititi will return to direct, and the movie will star Portman as Jane Foster, Chris Hemsworth as Thor, and Tessa Thompson as Valkyrie. During SDCC, Portman walked out on stage holding Mjolnir. It's apparent the next movie will play with Jason Aaron's Thor comic book run, where Foster picked up the mantle after Thor was deemed unworthy for the role.Thor: Love and Thunder hits theaters on November 5, 2021.Info from Gamespot.com
2019-10-17

When it comes to PC gaming, there's no shortage of deals and discounts on great games. Steam has its weekly sales, Epic has its free games, and now PC game store Fanatical has a great sale of its own. The Insanity Sale discounts a heck ton of great games for a limited time, including Bloodstained: Ritual of the Night and Middle-earth: Shadow of War Definitive Edition. The vast majority of them are available to redeem on Steam, with a few exceptions like Borderlands 3 (which is on the Epic Games Store) and any Ubisoft games, which will redeem on Uplay. Each product page will specify where the game key can be redeemed.Over the course of Fanatical's Insanity Sale, new flash deals will go up at a fairly constant pace. These deals won't last long--most discounts are available for 24 hours, while some only last a few hours. This story will be continuously updated with the best game deals as each flash deal comes and goes, so keep your eyes on us as the Insanity Sale progresses.The first set of deals feature the Castlevania spiritual successor Bloodstained: Ritual of the Night, the Lord of the Rings spinoff Middle-earth: Shadow of War Definitive Edition, and the management sim Project Hospital, in addition to real-time strategy game Grey Goo: Definitive Edition and the first-person classic Deus Ex: Game of the Year Edition. You'll also find a nice discount on Borderlands 3 and SoulCalibur VI for PC.The Insanity Sale is scheduled to end on October 18 at 2 PM PT / 5 PM ET. You can check out the table below for an overview of the best deals available now. Fanatical is also giving a sneak peek at upcoming deals over at its homepage.See all current deals at FanaticalBest Insanity Sale deals so farGamePrice (USD)Bloodstained: Ritual of the Night$25 ($40)Middle-earth: Shadow of War Definitive Edition$12 ($60)Project Hospital$15 ($25)Deus Ex: Game of the Year Edition$0.80 ($7)Hitman 2: Gold Edition$33 ($100)Everspace: Ultimate Edition$8 ($50)Brothers: A Tale of Two Sons$1.49 ($15)Borderlands 3$51 ($60)SoulCalibur VI$16 ($60)Monster Hunter World$26.39 ($60)Iconoclasts$8 ($20)In addition to the constant flash deals as part of the Insanity Sale, quite a few Ubisoft games are discounted, including Far Cry: New Dawn, Far Cry 4: Gold Edition, and Far Cry 5 as well as Assassin's Creed Odyssey and Assassin's Creed Origins. Watch Dogs 2, Ghost Recon Wildlands, and Rainbow Six Siege are also on sale, in addition to their various deluxe editions--Siege's various editions grant access to a certain portion of the game's DLC operators, depending on the edition.Bandai Namco also has a good selection of deals right now, with Dark Souls Remastered and Dark Souls III - Deluxe Edition on sale. Fighting game fans can take advantage of discounts on SoulCalibur 6 and Tekken 7, while others can grab Ni No Kuni 2: Revenant Kingdom and Ace Combat 7: Skies Unknown at reduced prices. The popular Dragon Ball Xenoverse 2 is also on sale.Info from Gamespot.com
2019-10-17

Destiny 2 boosted all players' Power level with the release of Shadowkeep. But if you want to bypass some grinding, you can pay to raise your characters' Power level even higher. This seems like standard time-saver, but the high cost and criteria for this purchase make it hard to justify.The purchase can be found in the character select screen. There, an option lets you choose a "Character Power Boost," which levels you to Power level 900. It costs 2,000 Silver, or about $20. That's already a costly purchase for the value, since simply playing the game can get you to the same point within 5-6 hours of play.Destiny 2's new character Power boosting screenBut the item is only usable if you have another character who has already reached level 900, which essentially means it's only available for alternate characters. Alts can reach level 900 even faster, since you can pass along some gear from your main character to speed the process along. And besides which, 900 isn't the level cap--it's just where the leveling process changes.So essentially, you're paying $20 for a small time-savings that's limited strictly to alternate characters and doesn't actually max your level. That may not be worth the cost."Shadowkeep represents a shift in the fundamentals of Destiny 2, and that has only improved the game," Phil Hornshaw wrote in GameSpot's Destiny 2 review. "Returning to the moon is full of spooky fun, and while Shadowkeep might not be as huge as Forsaken, it still provides some impressive additions to the world that will take time to fully explore. More meaningful choices in Shadowkeep are pushing me to think beyond just packing my most powerful guns and shooting everything in my path. These are improvements that represent a giant leap forward for Destiny 2." Destiny 2 Recent News Destiny 2 Iron Banner: Scour The Rust Quest Steps For New Armor Destiny 2 Update Out Now As Iron Banner Kicks Off; Full Patch Notes Released Destiny 2 Divinity Exotic Guide: How To Get New Shadowkeep Raid Trace Rifle Destiny 2 Shadowkeep Raid Guide: How To Beat The Garden Of Salvation Destiny 2 Shadowkeep: How To Power Above 900 And Get Raid Ready Info from Gamespot.com